Join World's Fastest Growing B2B Network
Join World's Fastest Growing B2B Network


| Port | Shenzhen Port |
| Packaging | By polywooden case |
| Lead Time | 20 days |
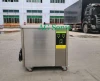
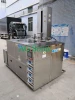
Heat exchanger tube Ultrasonic Cleaner


Scale deposits from magnesium, calcium and silica (from the water supply) form a layer on heat exchangers.
Any buildup that affects heat transfer clearly reduces the effectiveness of the heat transfer, which means your equipment will operate less efficiently, costing money – many time LOTS of money.
This inefficiency increases energy consumption and energy costs, creates wear and tear on your system, and can even increases plant downtime. Even a light coating of buildup can reduce heat exchange.
Regularly cleaning heat exchangers is necessary to prevent fouling, which is often caused by a dirty, malfunctioning burner.
A ultrasonic clenaer could solve the problem fast and quickly.
Steps of using Ultrasonic Cleaner:
Step 1 - Turn off the Power
When working with a boiler or furnace it is paramount that you take safety precautions. Accidentally puncturing a tube or hose can cause steam to strike you. Before cleaning any heat exchanger you should turn the power off and allow the system to cool down. Use your senses to tell when it is cool by listening to the system, touching the wall of the system or reading the heat gauge. You should also wear work gloves as there are sharp pieces of metal you'll be working around.
Step 2 - Accessing the Heat Exchanger
Use the screwdriver to remove the front panels of the furnace or boiler. The heat exchanger is located behind these and is identified by hoses and pipes attached to something resembling a bulky metal panel. The tubes you are concerned with are the metal tubes coming off of the heat exchanger. It is a good plan to write down where the hoses and tubes connect and how the heat exchanger is orientated because you will need to remove it.
Step 3 - Initial Cleaning
Use the small vacuum to remove any dirt or debris that may have accumulated throughout the life of this heat exchanger. Once the dust is removed you can then wipe down the tubes with soapy water and dry them off with a towel. You can also let them air dry if you prefer.
Step 4 - Remove the Heat Exchanger
Use the screwdriver and wrench to remove hose and tube fittings as well as hardware. Once these are removed you will be to work the heat exchanger free.
Step 5 - Clean the Heat Exchanger
Fill in the ultrasonic tank with chemical with fresh water and dip the pipe brush in the solution.
Set up time and active the machine.
Flush the heat exchanger with clean water and allow to air dry.
Step 6 - Clean the Heat Exchanger Tubes
Plug in the power washer and fill with cleaner and fresh water. Attach the hose to the intake tube and the other end to the bucket. Turn the washer on and squeeze the trigger. The treated water will flow through the tubes and recycle itself. Change out the treated water with fresh water to clean the tubes. Attach the heat exchanger, replace the covers and turn on the power.
About warranty:
All products of brand of AG SONIC have one year warranty, if any technical problem, replacement parts will be send immediate, and we also provide lifetime maintenance.
Please feel free to contact with us : ultrasonics.pro(@) gmail.com Whatsapp:+*********
Specifications:
| Specifications for ultrasonic cleaner T-180G | |
| Model | T-180G |
| Tank capacity | 840 liters |
| Tank size | 2000*600*700 mm |
| Unit size | 2200*1000*950 mm |
| Tank material | 2.5 mm,SUS304 |
| Ultrasonic power | 11.4kW |
| Heating power | 12KW |
| Timer | 1-99 hours adjustable |
| Heater | 0-95°c adjustable |
| Frequency | 28khz |
| Control | External generator* 5 pieces |
| Optional | Could be with : pneumatic lift, rinsing tank, etc. |
| Voltage | 220V or 380V ,3 phase; |
| Warranty | 1 year |
| Packing | 1unit/wooden case |
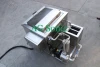
| With Filter |
Catch the oil , save the chemical |
D building, Yiban Industrial area, Donguan, Guangzhou province, China
One moment please
 Member's Area
 Messages
  Need Help